From Invisible to Indexed: How I Got a Solo Developer Website into Google Search
A practical walkthrough for making a solo developer website discoverable by Google, from public URLs and sitemap setup to Search Console indexing checks.
Background: Publishing Is Not the Same as Being Discoverable
After launching a personal product website, I wanted the site to do more than exist online. I wanted it to become discoverable through Google Search.
For a solo developer, this matters. A personal website is often the public record of a product journey: product thinking, engineering notes, release lessons, and build-in-public updates. But simply deploying a website does not mean Google will immediately find, crawl, and index it.
The initial question was straightforward:
If I publish a new article on my personal website, will Google include it in search results?
The short answer is: it can, but only if the site is technically accessible, discoverable, and not blocked from indexing. Even then, indexing is not instant.
The Need: Make the Website Search-Ready
The site already had a working public domain and blog section. A new engineering article had been published, and the page could be opened normally in a browser.
But browser access alone was not enough. The real checklist was broader:
- Is the article URL publicly accessible?
- Does it return HTTP 200?
- Is the article linked from the blog index?
- Is there a sitemap?
- Does the sitemap include the article URL?
- Is the sitemap submitted to Google Search Console?
- Does the page avoid
noindexor blocking rules? - Has Google actually indexed the URL?
This turned the task from “publish an article” into “make the article discoverable by search engines.”
Step 1: Confirm the Correct Public URL
The first issue was basic but important: make sure the correct production domain is being checked.
Many projects have multiple domains, subdomains, local folders, staging URLs, and deployment targets. It is easy to test the wrong one. The only URL that matters for Google indexing is the actual public URL users can access.
The production URLs were checked directly:
https://example.com/blog/
https://example.com/blog/my-article/
The article page needed to return:
HTTP 200
Not 404, not a redirect loop, and not a private or preview-only deployment.
Step 2: Confirm the Article Is Linked Internally
Google can discover a page through external links, internal links, or a sitemap. For a new small website, internal linking matters.
The blog index was checked to confirm that the new article appeared in the article list and linked to the final public URL.
This is important because an orphan page can technically exist but still be harder for crawlers to discover.
Good pattern:
Home page -> Blog index -> Article page
For small independent websites, this simple structure is often enough to make the content crawlable.
Step 3: Add a Sitemap
The website was built with a static site generator. The project already had a sitemap package installed, but it had not been enabled in the site configuration.
After enabling sitemap generation, the configuration needed to use the real production domain:
site: 'https://example.com'
This matters because sitemap URLs are absolute. If the site configuration points to the wrong domain, the generated sitemap can tell Google about the wrong URLs.
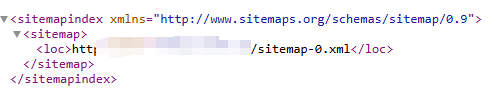
After rebuilding and deploying the site, these sitemap files became available:
https://example.com/sitemap-index.xml
https://example.com/sitemap-0.xml
The sitemap index pointed to the sitemap file, and the sitemap file included the important public URLs:
https://example.com/
https://example.com/blog/
https://example.com/blog/my-article/
Step 4: Add the Site to Google Search Console
With the site deployed and sitemap available, the next step was Google Search Console.
The site was added as a URL-prefix property:
https://example.com/
For a small product site or personal website, URL-prefix verification is often the fastest path. Common verification options include:
- uploading an HTML verification file,
- adding a DNS TXT record,
- using an existing analytics or tag manager setup.
After verification, Google Search Console could inspect the site’s URLs and accept sitemap submissions.
Step 5: Submit the Sitemap
The sitemap index was submitted in Google Search Console:
sitemap-index.xml
If the property is already set to the correct domain, submitting the relative sitemap path is enough. Search Console resolves it under the verified site.
After submission, Search Console reported that the sitemap index had been processed successfully.
That did not guarantee immediate indexing, but it confirmed that Google could read the sitemap and discover the URLs listed inside it.

Step 6: Request Indexing for Important Pages
For important pages, I used URL Inspection in Google Search Console.
The key pages were:
https://example.com/blog/my-article/
https://example.com/blog/previous-article/
For each URL, Search Console can show whether the page is already on Google. If it is not indexed yet, the “Request indexing” action can ask Google to crawl it.
This request is not a guarantee. Google still decides whether and when to index the page. But for a new site, it is a practical way to speed up discovery.

Step 7: Check the Result
There were two ways to check progress.
The first was public Google Search:
site:example.com
site:example.com/blog
site:example.com/blog/my-article
This is useful, but it may lag behind Search Console.
The second and more reliable check was Google Search Console’s URL Inspection tool. One of the submitted articles later showed that it had been indexed by Google.
That was the real success signal.
Result
The final result was:
- The article was publicly accessible.
- The blog index linked to it.
- The sitemap was generated and deployed.
- Google Search Console successfully processed the sitemap index.
- Important article URLs were submitted through URL Inspection.
- At least one article was confirmed as indexed by Google.
The work changed the website from “published but passive” to “search-ready and discoverable.”
Lessons for Solo Developers
For solo developers, getting content indexed is not only an SEO task. It is part of the publishing pipeline.
A practical checklist:
- Publish the page under the real production domain.
- Make sure the URL returns HTTP 200.
- Link the article from an index page.
- Generate a sitemap with the correct production domain.
- Submit the sitemap in Google Search Console.
- Use URL Inspection for important pages.
- Check indexing status in Search Console, not only public search results.
The main lesson is simple:
A website is not truly published until it can be discovered, crawled, and indexed.
For a solo developer building in public, this process is worth setting up early. Every future article, release note, technical lesson, and product update benefits from the same foundation.